Navigating QuickBooks® Inventory Valuation and Balance Problems
/QuickBooks Inventory Valuation And Balance Problems
QuickBooks inventory management is a feature that allows for the tracking of the inventory ‘ledger’ — specifically items, quantity on-hand and value – in the system. Ideally, this ledger provides the detailed information that supports the Balance Sheet balance for the Inventory Asset account.
But, there are several scenarios and uses of QuickBooks that will cause the Balance Sheet balance for Inventory Asset account to not be in-line with the Inventory Valuation reports from QuickBooks. We’ll be addressing the following questions in this article:
1. Why does this happen?
There are 4 reasons why the Inventory Asset Balance Sheet account will not align with the Inventory Valuation report.
1. Corrupt Data File
In our experience, this is the least common reason for the variance, but it can happen. However, it is also the easiest to correct (see next section) so we recommend you start there.
2. Posting to Inventory Asset without an Item
This is a very common reason for the misalignment. Take a look at our examples below to see different occurrences of this error.
Example A: Inventory Asset account used on “Expenses” tab.
If a user enters a vendor bill, and uses the “Expense” tab (vs. the “Item” tab) and the Inventory Asset account, this will cause a discrepancy.

Example B: Adjustment Account on Inventory Adjustment
When making an inventory adjustment, users often think that they should post to Inventory Asset account.

Example C: Journal Entry that posts to Inventory Asset
Similar to the above scenarios, a journal entry posting to the Inventory Asset account will cause misalignment.

3. Inactive Parts
This is also a very common reason for the misalignment. There are two unique occurrences of this problem, but both are due to the same core reason – items are made inactive.
Example A: Item Inactivated while quantity on-hand has balance
The first occurrence is when an item is deactivated, yet it still has quantity on-hand. When this happens, the quantity and value stay in the system, but are not included in the Inventory Valuation report.

Example B: Item is inactivated properly, but back-dated reporting is affected (a QuickBooks reporting limitation)
The second scenario is when an item is deactivated, because it has 0 on-hand and won’t be used in the future. This is a valid time to make an item inactive. Yet, when you run a back-dated Inventory Valuation report and Balance Sheet, for a point in history when this item did have quantity on-hand, the reports won’t align. Unfortunately the Inventory Valuation report will not display this item, because it is currently (and validly) deactivated.
4. Rounding
This is also a very common reason for the misalignment, but is typically of very minor (immaterial) consequence. We see minor rounding (pennies and small dollar amounts) when inventory is very active or when multiple units-of-measure are used. Once the prior problems are eliminated, if you have a small residual discrepancy, you can safely assume it is a rounding error. And, if it is small, it is not material to your financial statements or operations, so you may opt to ignore.
2. How do we fix this?
For each reason, there is a unique solution.
1. Corrupt Data File
To resolve: We recommend you perform a QuickBooks File “Rebuild”, as a first step, whenever there is a possible corrupt data file. See attached procedures provided by Intuit for this Rebuild process.
http://support.quickbooks.intuit.com/support/articles/HOW12158
2. Posting to Inventory Asset without an Item
To resolve: Note, it is important that you only change historical transactions, if you have confirmed with Finance, the CPA, and the business owner that it is OK to affect prior period financial statements. Therefore, this solution assumes that you will not be able to correct the historical transactions, but instead want to re-align the Balance Sheet by reversing the effect of these historical errors.
Step 1
Run a Custom Detail Report to identify the total $ associated with these historical direct postings to Inventory Asset
Menu: Reports / Custom Reports / Transaction Detail
Display Tab:
Include ITEM field
Sort by ITEM
Date Range = All
Filters Tab:
Account = Inventory Asset
Step 2
On the report, determine the adjustment needed. This is the total balance of all postings without an item #, see below for example.

Step 3
Create a journal entry to reverse the effects of this balance created without items. For the example above the journal entry would Credit Inventory Asset by $21,200.95, and Debit Inventory Adjustment (cost of goods sold account) by $21,200.95.
3. Inactive Parts
Example A: Item Inactivated while quantity on-hand has balance
Step 1
Run a Customized Item Price List Report to identify the inactive items with quantity on-hand
Menu: Reports / Lists / Item Price List
Display Tab:
Include Quantity on Hand field
Filters Tab:
Active Status = Not Active
Qty on Hand >= .01 (greater than or equal to one penny – note that this will report both positive and negative quantities on-hand)
Step 2
On the report, determine the items that need to have their on-hand quantity zeroed out.

Step 3
Double-click on each item on this report to edit. Uncheck the Inactive check box.

Step 4
Zero out the quantity on-hand for each of these items via an inventory adjustment

Step 5
Edit the items to make them inactive again
Example B: Item is inactivated properly, but back-dated reporting is affected
There is actually no correction needed for this discrepancy. It is essentially a ‘reporting limitation’ in QuickBooks –inventory reports are usually automatically filtered to only show active parts. If you require inventory reporting to support each Balance Sheet account, and need to do so historically. We recommend that
Option 1: Run the Inventory Stock Status and Inventory Valuations at each month-end, before any closed-out products are inactivated. Export these reports to Excel in case they ever need to reproduce the supporting reports for history.
Option 2: In case of audit or other retroactive review, they can also opt to re-activate all items, run the reports, and then make the items inactive again.
Of course, neither solution (Excel stored reports, or re-activating old parts) is ideal. Both are workarounds for this reporting limitation.
4. Rounding
Any impacts of rounding should be immaterial, and therefore we don’t recommend any specific resolutions steps for these discrepancies. The effects of rounding are typically a few dollars or less.
3. How do we prevent this in the future?
Finally, let’s talk about how to keep these things from happening in the future.
1. Corrupt Data File
This isn’t possible to prevent, but you may want to do a monthly “file maintenance” process as part of your month-end close. Perform the Rebuild steps in the link below:http://support.quickbooks.intuit.com/support/articles/HOW12158
2. Posting to Inventory Asset without an Item
To prevent this problem, all QuickBooks users need to be educated to:
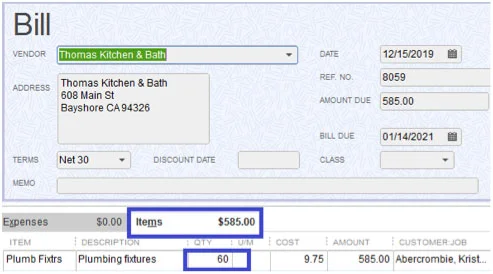
Never post directly to the Inventory Asset account (on a credit card charge, check, vendor bill, etc.). Anything that affects inventory should use the “Item” tab of these transactions. Below is an example of a correct bill for inventory purchases:
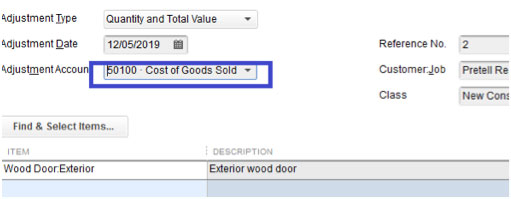
Inventory Adjustments should not have Adjustment Account = Inventory Asset. Instead, use an expense or cost-of-goods-sold account as the Adjustment Account. Below is a correct Inventory Adjustment:
If item value and/or quantity changes are needed, it is recommended to use inventory adjustment transactions, not journal entries.As a general rule, journal entries should not be posted directly to the Inventory Asset account, because this account balance should be supported by the inventory details. (Note that an exception to this rule is in correcting historical erroneous postings, as noted in solutions in this article).However, there may be occasion where the business’ CFO or CPA requires a journal entry to Inventory Asset for historical balance adjustments. In this case, we recommend that this journal entry be reversed in the following period. And, for the period in which the adjustment was originally made, be aware that the Balance Sheet and Inventory Valuation reports will not align.An alternative to making journal entries to Inventory Asset (for CPA and CFO requested adjustments) is to create a separate Balance Sheet account for these “non-item” adjustments. This Balance Sheet account would be managed via other close/reconciliation processes, and would not be supported by the inventory tracking features of QuickBooks.
3. Inactive Parts
To prevent this problem, all QuickBooks users need to be educated to
Before making an item inactive, adjust quantity on-hand to 0And, to avoid historical reporting challenges, see the notes in the prior section about the QuickBooks reporting limitations and options for handling.
4. Rounding
As mentioned in the prior section, this is of immaterial impact and cannot be prevented.
Please let us know if you have any questions about the material above. If you have found it helpful, please feel free to share it with any colleagues who may benefit from this information.